Making my Final Piece
Making my Final Piece
Shape
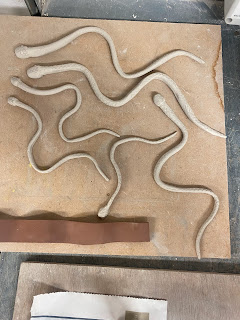
Once I had settled on making black king snakes for my final piece, I then had to go into 'production mode' and produce enough to display. It was at this point that I discovered it was easier, quicker, and more realistic to shape the snakes into an 'S' rather than a coil. This is because when I coiled them, the bodies would dry out and crack, whereas the 'S' shape lessened the chance of them cracking (and was easier to fix when they did), and they looked more natural. This shape then led me to design my final piece as if the snakes are 'slithering' over an object.
Display
After talking to my tutors I decided that I would display my snakes by having them slithering over a mirror. It was suggested to use a mirror with an ornamental frame, but I felt that it would be too 'busy' and the frame would end up taking the attention away from the snakes. I then chose to use a simple mirror which I found at Wilko as my base. It was a simple arched mirror with a very thin metal frame which I would adapt to my needs.
To make the mirror suitable, I had to add extra material around the edge to create a thicker base to attach the snakes securely. Following the advice of staff in the workshop, I did this by surrounding the edge with 2 inches of MDF, which was surrounded by two pieces of plywood underneath and on top to add to the height so it matched the height of the mirror. The plywood on the bottom covered the entire backside, which the mirror, MDF layer and top plywood layer were glued onto to create a solid and secure structure.
Once this was completed I decided to put the snakes on top, without glue, to see how they looked together. It was at this point that I decided to paint the frame as a few people I asked for their opinion had different thoughts. My tutors both felt like I should keep the frame as is, but James in ceramics liked the idea. Ruby, another girl in ceramics, also suggested that once it's painted, I should sand down some areas to create a more 'rustic' effect. At this point my plan was to do just that, paint black and then sand it down.
I also had to make a decision on wether I 'prepped' the surface before painting, meaning if I should use filler on the surface to create a smooth surface. Although this would cover up the edges of the nails used to hold the wood layers together and any chips in the surface, I decided I would leave them as is. This is because Like the idea of a little 'wear and tear' in the surface, hinting at the idea that the snakes have been slithering over the surface. It would also work well with my idea to sand down the paint for a rustic feel.
This is how the frame looked once painted and the snakes were placed on top. At this point I sanded a section on the back to see how it looked. This is when I realised that I wasn't going to sand it as instead of taking off the pigment, the black was just muted to a grey which didn't look good. So I decided to keep it as the solid black, which I still think looked great, and the little imperfections in the frame gave it enough of a rustic and worn down effect so I was still happy.
Deadlines
Because I was working with ceramics, my deadline for the production of the snakes was a lot sooner than the normal deadline which was the 8th of June. Although I ended up finishing them all before the half term (including all three firings), I made myself my own set of final deadlines to work towards.
Fortunately, by the 9th of May I felt that I had enough snakes so I began the firing process and finished them all completely on the 24th of May.
During this time was when I also had to fit in the making of the frame. Because of the college getting ready for all its shows, the workshop was busy helping others as well as painting the walls in the other building, so they had a their own deadline with helping students for the 26/5. Although I had bought my mirror late, I was still able to get the frame finished with time to spare on the 25th.
Arrangement
For the arrangement of the snakes, I chose to have the frame and edges of the mirror covered in snakes, and the centre be empty. This was so that when you looked at yourself in it, the viewers face would be relatively clear, and the snakes would surround them, like a crown, or medusa. This would give the effect that the viewer is included in the snake den (the collective noun for a group a snakes).
Attaching the Snakes
Once the frame was finished and I had decided on the arrangement, I had to attach the snakes. It was suggested to use two-part epoxy resin, so I bought a couple of packs and started the terrifying and irreversible act of gluing them on. I mixed the resin in very small batches as it dries incredibly quickly, so it took about 15 minutes to glue just three snakes. The first few snakes I glued didn't come out as well as I had expected as the glue acted in a way I wasn't anticipating. I misjudged the time it took for it to dry, so with the first two snakes (I strategically started in the bottom corner), when I lifted my hands up I accidentally moved the snakes as well, causing a pool of glue to surround their tails. Before it dried I managed to scrape up as much excess resin as I could, which I did quite successfully, but caused me to reduce the amount of glue I used as well as being more careful when moving my hands to not nudge the snakes. Another mistake I made at the beginning was I misjudged which part of the snake touched the surface. I place the snake down and saw the points of contact where the snake touched the surface, but with the first snake that touched the mirror, I had misjudged this. This caused me to press down on a particular point of a snake which was in fact not touching the mirror and I ended up snapping the tail. I manage to glue the snake back together, but it meant I was much more careful with the snakes on the mirror to accurately find the points of contact.
Once I had worked out the kinks, it came together rather quickly and overall I was very pleased with the result.
Placement
Once I had finished the snake mirror I had to decide where to display it. In this show, everyone is showing their pieces in the same place so I had to take that into account. My first idea was to have the mirror be the only thing the viewer can see when in front of it, almost like it's in an empty room, and all you can see is yourself surrounded by snakes. This however was impractical for the purpose and capabilities of our space, which was showcasing the entire class' work. I therefore had to look at the other work being shown and chose someone who's work would match the 'vibe' of my piece, being dark, and possibly sinister depending on the viewers opinion.I decided to put my work opposite my classmate Jazz's work, which was a number of pieces containing dark colours and skeletons of hands and birds. I did this so that the presence of work in the background would add to the overall effect of the mirror, being dark and moody, rather than distract and alter the viewers idea of it, as it would if I put it opposite a brightly coloured and 'happy' piece.
I also thought to place my mirror at a height where a person of 'average' height would have their face in the centre, where the biggest gap of snakes is. Unfortunately, the walls we are showcasing our work on are only partition walls, so they are only 2 metres tall, and therefore I had to place the mirror a lot lower down. Although this will still be at a height where my desired affect would still happen, it was something I wish I could change.
Overall I am very happy with my piece. I like how the black frame allows the snakes to 'blend' in and not be too noticeable until you focus on them, almost revealing more snakes the more you look. I also like how the bronze lustre is subtle, yet adds a 'regal' effect, adding to the medusa and crown look I was going for.


Comments
Post a Comment