Early Stages
Early Stages
Scales
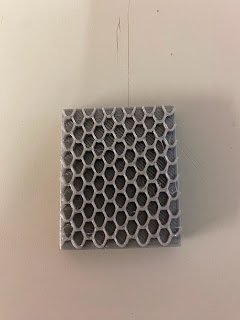
The first challenge I came across was to find an effective method to put the scales on the snakes. It had to be quick, but also consistent each time to emulate the scales on real life snakes. I ended up 3D printing a scale 'printing' tile, which would transfer the texture of the scales onto the clay.
Although this was meant to just be a practice piece which I would revise and change the size and depth if needed, it turned out great so I have used this for all my snakes. We rounded the top surface (the top and bottom edges are more shallow with a peak in the centre) so I could roll the tile over the snake and reduce any harsh, inorganic, lines, as well as to reduce the chance of the tile getting stuck to the clay.
Heads
For the first snake, I attempted to follow a tutorial by 'MP Gautheron', but I wasn't very happy with the final result. In my opinion the head looked more like a Crested or Leopard Gecko than any snake I was trying to make. The tutorial directed me to make indentations for the eyes (little balls of clay) which I would then surround with a small piece of clay. This however made it look like eyes had eyelids, which snakes don't have.
After this, I made a few stand alone heads (without bodies) to figure out the best way for me to make them.
Through this, I decided to use the scale tile to produce the scales on the head. My original plan was to individually add scales to the head with a separate tool as the scales on the head are different shapes and in different directions than on the body, however I was not able to produce the effect I wanted using tools. They scales were at inconsistent depths, at it was difficult to make them blend together seamlessly in order to create a passible recreation of a real snake head. The scale tile however, produced the consistent texture I desired. I decided to compromise on the direction of the scales, from them being different all over the head, to just swapping the direction. So I would have scales going down the body, towards the tail, but on the head, I would flip it so that the scales were going towards the tip of the nose, which was the closest I could get to a real snake.
Bodies
Making the bodies was a lot harder than I had anticipated. When I rolled the clay into a long 'coil', instead of rolling evenly, it would 'fold', creating an uneven texture and preventing the clay from being malleable enough to put into shape. I then tried to make the coils by using a clay extruder, which would create a perfectly smooth and even coil, but this caused more problems than it solved. For one, it was difficult to squeeze out the clay through such a small hole, and I was not quite strong enough to do this. After I had a coil, I then had to roll the end so it tapered down, like a tail. Once I had done this, the clay had been out of the bag so long that it had dramatically dried out, so when I tried to position the snake into a spiral, I could only manage a small bend before the tail snapped off. Because of all of this, I decided to go back to my first option of rolling the clay with my hands, but to make smaller snakes so I could roll and position them a lot quicker, causing less of them to crack and break at this stage.
This was the first snake I made. The head I made whilst following the tutorial, and the body was made with the clay extruder method. The tip of the tail you can see had snapped off and been reattached, but you can still see the join. Although this was an all right first attempt, I was annoyed to realise after bisque firing that I had forgotten to add scales to the body.


Comments
Post a Comment